Monday, December 3, 2012

gold embossed Christmas dove

I love this sweet little card!  So fun and easy to do!  Emboss your dove, fussy cut it out (I love to do this.  It's so relaxing.  If you haven't learned to love the fussy cut--just cutting out around a stamped image--try sitting back and doing a small stack of images all at once.  Put your feet up and enjoy it! Or maybe it's just me?)

A felt leaf (love those dies) and a paper flower with a pearl center...we've given it a little glitter to make it shine!  The faux bois background (that's fancy french for fake woodgrain) and a little bit of twine ties it all together.

Fun, festive, different, simple and sweet...this is my kind of card!

Make a stack and give them as gifts.  Use them for your Christmas card...or really anytime of year.  Most versatile card ever!

Hope you found this inspiring.....

If you are looking for supplies try HERE.

Thursday, July 26, 2012

LONDON!

I've always loved England.  I've always been captivated by the stories, history, and art.  And well, the accent.  Living, as I do, in the area that calls itself "the birthplace of the Revolution" I occasionally get a funny look.  But this year all the world loves London. The Olympics are almost here!  I'm counting the moments!

And while I'm waiting, I'm making this cute memory game.  How fun is this? Too cute and it gets the gold medal from my kid testers!  Using the small maple tags, some of my favorite stamp sets and lots of red, white, and blue it stamps up fast and is ready to play!


Don't you just love to step out of card making and find a fun new way to use your paper-crafting smarts and supplies?  I do!

Enjoy the Olympics!  GO TEAM!

Thursday, June 14, 2012

...the Grand ol' Flag

In my family we often have parades. When ever there is something to celebrate like someone's birthday or good news of any kind really it's time for a parade.  I remember a lot of parades during potty training!  You did it!! WooHoo for you!  Let's have a parade!  It's just us being goofy and marching around the house, clapping, singing (loudly and often out of tune), and laughing as we celebrate in a big and spontaneous way the little everyday moments in life.  One of the songs we often sing is "Grand Ol' Flag!"   It's got the upbeat, marching kind of tempo just right for a spontaneous parade!

I couldn't help but think of all of that as I made this card.  It is a grand ol' flag!  It makes me smile.  It makes me proud.  And I am thankful for the many things it stands for.  So today, on Flag Day, I have this to share with you.


It was super fun to make! The Sheet Music background stamp is so fun to use and I liked putting this spin on it.  I used daubers to ink up the specific areas of the stamp in order to give it the look of a flag. Stamped the background, added the sentiment, mounted it on a cherry cardstock base, a little navy ribbon and voila!

Wherever there is a grain of loyalty,
there is a glimpse of freedom.
-Algernon Charles Swinburne

Happy Flag Day!


Card Recipe  All the crafty goodness you see is from A Muse Studio
Stamps: Sheet Music Background, Let Freedom Ring (both on sale this month!)
Ink: Cherry, Navy
Cardstock: Sugar, Cherry
Embellishments:  daubers, Navy satin ribbon

To pick up any or all of this crafty goodness go to:  www.amusestudio.com/lara

Tuesday, June 12, 2012

...fast & fabulous Gifties!

It's that time of year. School is just about over and I've got teacher gifts on my mind. Here's a super fun and fast gift idea for ya. Who wouldn't love this pretty bouquet of pens?!

They are easy-peasey to make. Just die cut flowers from cardstock and punch a hole in the center. Then add a glue dot to secure it to the pen when you slip the flower onto the pen top. The grass green cardstock, papaya polka dot ribbon and stamped sentent finish it off beautifully.

Everything you see is A Muse Studio crafty goodness. Leave a comment if you'd like more info on how to make these pen bouquets or want to order supplies.

Happy crafting!


To make the sentiment tag I used the lined paper stamp from the School Days set, stamped it in bermuda ink, and then cut it out and tacked it down with a glue dot (love those things so handy!)>


Here's a close up of the pens.  I bent the petals a little so they weren't so flat.


The all just tucked in the cone so nicely that I didn't need to do anything else. Just arranged them nicely. 


All supplies are by A Muse Studio.
Stamps: School Days
Ink: bermuda, onyx
Cardstock:  grass, grapefruit, burano, bellinin, papaya, sugar
Embellishments:  papaya polkadot ribbon, crop-a-dile, a|s exclusive flower die #1, and pens of your choice.

Tuesday, April 17, 2012

...lido!!!

I am so in *love* with this color!  It sings of spring.  I was inspired by the color that is blooming all around. Isn't it lovely to see more than just grey and white?!  And this yellow is so cheerful. 


lido is part of the A Muse Studio Venetian color palette.  If you are looking for a pop of color, look no further. The Venetian pallette is sassy (burano), bold (lido), bright (bellini) and a little bit moody (rialto and titian).  They play well together and they work wonders with the classic A Muse Studio palettes.  

Not only are these colors some of the hottest, on trend colors of the spring (they are everywhere!!!)  but this little cutie of a card uses one of my favorite techniques and a huge trend right now bold, white embossing!  Embossing has stepped out of the 1990s and has a bold fresh look especially when combined with vivid colors!  

If you want to have some fun with embossing and all of the latest and greatest A Muse Studio bold images leave me a comment!  I do workshops throughout New England and in the NJ tristate area.

Card Recipe:  Stamp Set-floral duet; Ink- lido, versamark; Cardstock- slate, sugar; Accessories- white embossing powder, static magic and heat tool, lido satin ribbon, 3D tape and detail scissors.  All products by A Muse Studio.  Contact me or visit my webstore at www.amusestudio.com/larakalapacs.

Sunday, April 8, 2012

Easter Sunday


This is a fast & fabulous card that I was inspired to make for Easter. I had made some small crosses with palms from Palm Sunday. With a grunged sunray background behind it and a hand written sentiment it took no time at all to make this pretty card.

Card Recipe:  Stamp Set - grunged sunray; Ink - blush;  Cardstock- sugar; Accessories- glue dot, copic multi liner, palm leaf.  All products are by A Muse Studio.  Contact me for more info or visit my website at www.amusestudio.com/larakalapacs.

Wednesday, February 29, 2012

I <3 ROBOTS

I love this new set and just couldn't help making this card in two different color palettes! Some washi and some twinkles finish it off with just the right amount if bling. Love it!

Don't  you just love a fun, easy card that makes you smile?!  I think a mini scrapbook NEEDS to be made!  


Card Recipe
All Products by A Muse Studio
Stamp set: love machine
Ink: grass, bermuda, orange, ocean, blush, papaya, bubblegum, Versafine-black
Cardstock:  sugar, lime, bubblegum
Embellishments:  washi tape, assorted twinkles


Thursday, December 1, 2011

a little man with a BIG heart!

Happy December!


I love this little guy! It's one of the easiest projects ever. 
(and if you come to the workshop on Saturday you'll get to
make one of your own!) 2 dies and a little twine and you
have the cutest little guy. The only thing better is...


more than one!


All products are by A Muse Studio
Card Recipe:  Cardstock- cocoa, cherry; Accessories- gingerbread die, heart trio die, cherry baker's twine

Thursday, November 24, 2011

Thanksgiving!

Happy Thanksgiving! 


Thank you for visiting my little corner of the web. Today I want to share this little inchie card and my gratitude to all of the friends, old and new, that share their creativity with me. Thank you to my customers and hostesses for spending time getting crafty with me. I appreciate doing the fun business that we do together! Thank you to my fellow A Muse Studio Creative Consultants--working with you is a joy and a privilege. I thank God everyday for the blessing He has given through this creative endeavor and sharing that with people like you makes it all the more rewarding. Many blessings to you.

I  hope you like my little card. Inchies are one of my favorite things to make. They are great any time of year with any kind of stamp or style! I'd love to see what kind of inchies you make. 

All products by A Muse Studio
Card Recipe: Stamp Set-Turkey Time; Cardstock- vanilla, pumpkin; Ink- memento rich cocoa, french roast; Accessories-copics, 1" square punch

Sunday, November 20, 2011

a little inspiration!

Sometimes we all need a little inspiration. These are some of the things that have been inspiring me lately. These designs are from the A Muse Studio Inspiration Guide & Catalog. This is one of my favorite places to look when I need some ideas. So here's a little something to get your creative self going....


This Warm Winter Wishes card uses a pretty stamp set that's on sale right now through the end of December. I'll be teaching it at my November and December workshops. If you're interested send me an email. at  lara@amusestudio.com.

It uses a few of my favorite things: glitter and super stick tape, a stamp positioner (love that tool for lining things up "just right") and candy cane stripe patterned cardstock.

What are you making this Christmas?


And how cute is this tag?

A little cocoa cardstock, a g-man die, a warm felt heart, some bakers twine for a scarf, and little glitter to give it a sugar dusted touch!

I just love this little guy....he will be making an appearance on my Christmas gifts this year. Everyone needs a little man so cute and yummy...makes ya just want to bite his head off. I'm hungry for some cookies all of a sudden. How 'bout you?

What inspires you lately?


All products used are from A Muse Studio. These cards were designed by the talented Creative Muses at A Muse Studio. I did NOT make them....yet.....just was so excited I had to share.

Monday, November 14, 2011

red and white (& the new Spotlight!)

I am a big fan of red & white. I love to mix these colors any chance I get. And Christmas gives me an occasion to really play with that. So when I saw the new Spotlight projects it was love at first sight.                                                        The coasters are adorable and I am going to be making some tomorrow. {Ann, if you are reading my blog, close your eyes! You may be getting these for Christmas!}  How cute & easy! Gotta love that....tie them up with some ribbon, add a hot cocoa mix and you've got a cute little Christmas gift good to go. Come to think of it I wonder who else might like this. Hmm... This could be fun!                                                    If you haven't had a chance to play and create with the A Muse Studio felt you have been missing out. The colors are lovely and coordinate perfectly with the ribbons, paper, pearls and twinkles. But as you can see, sometimes you don't even need bling (did I really just say that...no sparkle necessary? But look at how cute, fast, and fabulous these coasters are!!). All you need is some felt, some heat'n'bond and some dies. Easy-peasey-lemon-squeezy! Crafty goodness at it's best! 


And I love this little tree. SO easy to make! Isn't it great when a simple project gives you that big WOW! factor you're going for?!  I may just have to host my own Cookie Swap after seeing all the beautiful and inspiring project for this month's Spotlight. Click on the a|s Spotlight tab about to see more inspiring photos and all of the Spotlight details! And if you really love it, email me and we can set up YOUR VERY OWN WORKSHOP featuring the current Spotlight features or anything else that you'd like to make. I do workshops all over the New England/Seacoast area and New Jersey when I'm in the area. I'd love to get crafty with you and your friends! Email me with your contact info and we will set something up. I have a  few spots left but they are going to go soon....don't miss it!

lara@amusestudio.com

Tuesday, November 8, 2011

...acorns!

I saw this card at the A Muse Shop and knew that I was going to have to make it myself just because it is so cute! I also live in a place where there are a lot of squirrels and acorns so it feels rather home-y to me. 


This is one of those cards where I like to use my stamp positioner to get those acorns all lined up "just so." If you haven't tried this tool yet it is worth playing with. It's easy to use and can save you a headache of what could be "fussy stamping."  You can just stamping it quick and get to the copic coloring.  So that's my little woo hoo for the stamp positioner and to the creative muse stamping away at the shop.....Love this card! Thank you!

All products by A Muse Studio
Card Recipe: Stamp Sets - woodland friends, autumn beauty; Cardstock - wheat, fern, sugar; Ink - Memento black, french roast, nutmeg; Copics - YG95, YG97, E33, E37, W2

Thursday, October 27, 2011

Sunday, October 23, 2011

....leaves.

 Happy Fall! This is my favorite time of the year. I love the changing of the season from Summer to Autumn. I love the changing of the leaves, the riot of color that happens every year. When I first saw this stamp set I knew I would have to have it to play with. It just makes me so happy.


Here's a close up! Don't you just love how the inks play so nicely together and layer like a dream?! 


Card Recipe: ALL ingredients are A Muse Studio. Stamp sets: autumn leaves, mesh background, contemporary greetings; Cardstock: squash, vanilla; Ink: nutmeg, squash, pumpkin, toffee
Post or go to www.amusestudio.com/larakalapacs for info on ordering these goodies.

Thursday, October 20, 2011

It's Spotlight time again! 
This month we have a beautiful Autumn Harvest theme. It's perfect for Thanksgiving and any other get together you may be having this fall. I love the inspiration to take my stamping off the card and into so fun decorating.


I am giddy about these sparkling pumpkins! I love the shimmer of the A Muse Studio Diamond glitter in the candle light! What a fun way to add an elegant touch to a Harvest celebration of any kind. I've got my mind on Thanksgiving right now, but I can't help but wonder what in my house will wind up glittered by Christmas. Anything that doesn't move on it's own is in serious trouble!

If you are suddenly in need of some glitter or you're interested in shopping the Spotlight check out my website: www.amusestudio.com/larakalapacs.  And if you'd like to host a workshop in the New Hampshire Seacoast area send me an email at lara@amusestudio.com. I'd love to teach you and your friends how to make some of these fabulous Spotlight projects!


Wednesday, September 21, 2011

...halloween owls.


 I love this little owl! He makes such a perfect wrapping for this halloweenie button bracelet that I made. I first saw the owl as a spotlight project done in blues and yellow, and I knew I was going to have to make an orange and black version of my own.

It was so easy I can hardly stand it! (My favorite kind of project!) Just cut out some circles and an oval with your dies and Big Shot. Stamp some circles in onyx. Trim the top of your mini brown bag to a point. Stick everything down. Add some buttons to finish the eyes and you are good to go!

The bracelet was equally easy, just slip buttons through split rings and link them to a bracelet. It takes a little longer to do than the owl, but it's easy enough.

What a hooot! (couldn't resist!) Happy Halloween crafting!!

All products used are by A Muse Studio:
Stamp Set- rock star; Cardstock- sugar, onyx, pumpkin, papya; Ink- onyx; Accessories- (mini) brown paper bag, onyx buttons, glue dots, pumpkin buttons


Split rings and bracelet were from my stash of crafty goodness, but similar items can be found in craft stores and jewelry making websites.
https://www.amusestudio.com/larakalapacs


Friday, August 26, 2011

...chocolate

I've been obsessed with dressing up treats for the last little bit and I don't see that ending any time soon. Here are 2 of my latest. Hope you find them inspiring!


It's amazing to me how much fun a simple chocolate bar can look when you dress it well. So much fun to play with! Frightful and delightful indeed!

All Products are A Muse Studio
Treat Recipe: Stampset-too cute to spook, Ink-versamark, onyx, Cardstock-onyx, orange polka dot, Sleepy Hallow, wasabi, slate woodgrain; Accessories-web/swirl impression plates, onyx baker's twine, onyx and white embossing powder, twinkle stickers, nestibilities circle die, tag die, sanding block and score board.

Tuesday, August 23, 2011

...a funny pun


If you know me for any length of time, you will learn that I love a good pun. They make me laugh, I can't help it. So a friend sent me this picture from Disneyland of a sign it was called Le Bat en Rouge...I couldn't do anything but go and make a card...

All products are by A Muse Studio.
Card Recipe: Stamp sets-Essential Sentiments and Spooky Boo Day; Ink-slate, onyx, pebble; Cardstock-onyx gingham, sugar, onyx shimmer damask, onyx and cherry; Accessories- red twinkle stickers, spooky fence die, pinking border die, 3d tape, bat trio die (AND a very punny pun!)

Sunday, August 21, 2011

...dressing up treats!

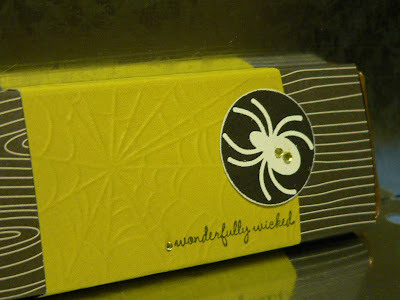
One of the things I like most about Halloween is all of the fun ways to make treats a little extra fun! A Reeses Peanut Butter Cup is a good thing all on its own, but how cute is it when it is all wrapped up in black & white polkadots and a fun halloweenie colors?! I couldn't resist making more than one! I think I like the orange best, but the reverse scallop on the purple is fun too, and I love the new wasabi green cardstock. It's good I don't have to choose. :)

It was easy-peasey-lemon-squeezey to make these just wrapped the polkadot cardstock around the PB cup, added a band of color and used a dot of adhesive to hold it together (don't want to make it too hard to get to the treat afterall). I did a little something different with each of the colors--stamped the green with "trick or treat", reverse cut a scalloped edge on the purple, and wound some onyx baker's twine around the orange.
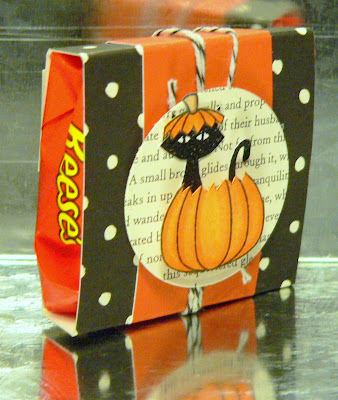
For all three I cut out circles in Sleepy Hallow text Cardstock and stamped and colored the pumpkin. I needed to cut off the top of the pumpkin and then stamped and cut out the cat and stuck 'em all together. So much fun!

What will your treats be dressing up as this year? I've got more ideas coming over the next couple of months so keep an eye out. If you LOVE an idea you see and need more info or would like to know how to get the goodies to make your very own please let me know. You can email me at laralovek@gmail.com.

All Products are by A Muse Studio.
Recipe: Stampset-too cute to spook; Cardstock-onyx polkadot, pumpkin, wasabi, heather, Sleepy Hollow, sugar; Ink- memento tuxedo black, onyx; Accessories- onyx baker's twine, scallop border die, 3d-tape, Copics in Y38, YR16, YR18, E31, E33.